Smarter Drafter allows branding to be easily added to documents using the stored branding at the Organisation level or in Offices. This allows dynamically bringing in the right branding based on the Office selected for the document.
Before adding branding to Organisation and Offices, Branding Types need to be setup. Details on how to do this can be found in this help article.
Branding is supported in Content Blocks to help with reusability, learn more about Content Blocks here.
Add & Edit Branding for Organisation
1. Navigate to Account then Organisation & Offices, then click Edit on the Organisation. If you have yet to setup initial Organisation details this will need to be done first.
2. Click on the Branding tab.
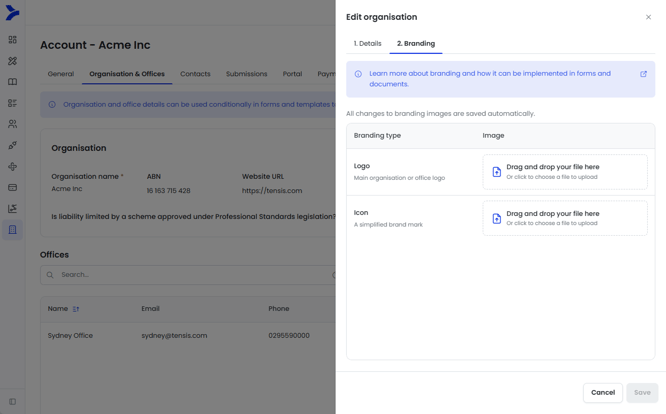
3. Branding types added will appear in the list. Supported file types are JPG, PNG and SVG.
4. Either drag and drop an image file or click on the upload file area to add an image.
5. Once uploaded, the image will show a preview. Click Save and exit.
6. The new image will now be available to be used in document automations.
Replacing an image requires the uploaded image to be deleted and a new image to be uploaded.
Add & Edit Branding for Offices
1. Navigate to Account then Organisation & Offices, then click Edit on the Office you wish to add branding for. If you have yet to setup an Office this will need to be done first.
2. Click on the Branding tab.
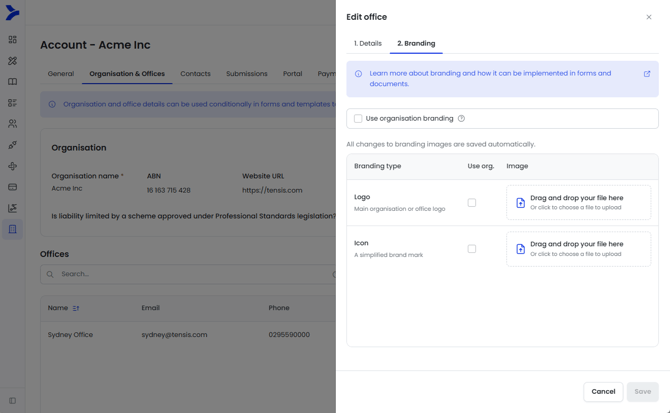
3. Branding types added will appear in the list. Supported file types are JPG, PNG and SVG.
4. Offices allow the branding that is used at the Organisation level for all or individual branding types to be selected.
If you wish to have the same branding type as Organisation for all images for the Office then click on the Use organisation branding option at the top.
If you wish to have certain branding types use the Organisation branding and other branding types be different, then check the 'Use Org' option at the branding type that will use the Organisation branding.
5. To upload any images unique to the Office branding type, either drag and drop an image file or click on the upload file area to add an image.
6. Once uploaded, the image will show a preview. Click Save and exit.
7. The new image will now be available to be used in document automations.
Replacing an image requires the uploaded image to be deleted and a new image to be uploaded.
Apply Organisation or Offices branding in documents
Once the Organisation and/or Office branding is set up, the images can then be used to in document automations.
1. Once the form is created with sections and fields, navigate to the Word document file.
2. Open the Smarter Drafter builder Word add-in.
3. Click on More, and select either Organisation Fields or Office Fields depending on which branding you wish to add to the document.
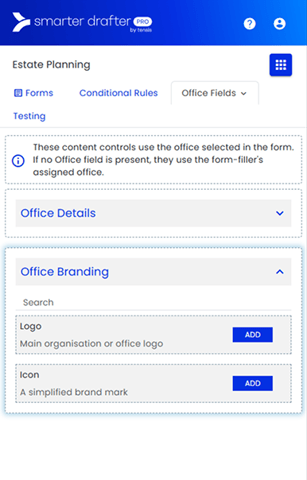
4. Click on the Organisation Branding or Office Branding, then click Add.
5. A placeholder image will be merged into the document and can be resized to the optimal dimensions. See more details here.
6. Ensure to upload the document once done and test that it appears correctly in documents generated.
Important:
Organisation will always take the details of the Organisation Branding for all fillers. However, Office branding is dynamic based on the Office assigned to the user profile of the person submitting the form in Smarter Drafter.
If you want the form filler to be able to choose a different Office to the one that a form filler may be associated with, use the Office field in your form to allow the form filler to select another Office. Learn more about the Office field in this help article.
Common Issues & Solutions
- Issue: A document is generated, and one or more of the User Profile Fields, such as "Direct Phone" or "Signature," are empty
- Solution: If a user has missing information in their Smarter Drafter profile (e.g., they haven't filled in their Practising Certificate Number), the corresponding field in the final document will appear blank. Ensure the profile information is completed so that the values of the fields can be used in documents.