BETA: Email Automation is currently in beta and may change as we continue to develop it.
Email Automation lets you create email templates alongside your document templates. You define the recipients, CC, and subject using form fields, and you choose a Word document template whose content becomes the body of the email. When a form is submitted, Smarter Drafter generates a draft .eml file the drafter downloads, reviews, and sends from Outlook or any compatible email client.
The email body is driven by a document template, so it supports everything your Word automation already does: merge fields, conditional rules, calculations, repeats, and images. Smarter Drafter does not send the email. It produces a draft .eml only.
Setup instructions
Before starting to setup an email template, ensure to build your automation in the usual method by creating the form and merging the form values into a document template. Email template will use the form fields and document template.
IMPORTANT: Keep the body document template simple. Emails are meant to be simply formatted, so favour plain paragraphs, basic text styling, and straightforward lists. Build a dedicated, stripped-back document template for the email body rather than reusing a full court-ready or letter template.
Create the email template
1. Once your form and document template is setup, open your form in the Form Builder and go to Documents > Templates.
2. Click Create Email in the top right of the templates table.


Set the recipients and subject
4. In the To field, start typing a field name and select a form field from the search results. Only text and email-address fields appear, including hidden and read-only fields.


Note: if using a text field to capture multiple email addresses, this must be stored in the field with the email address and ; as the delimiter.
5. Add fields to the CC field the same way. The same field can be used in both To and CC, but a field can't be added twice to the same field.
6. In the Subject field, enter free text, form fields, or a mix of both. Click Insert field to search for form fields to add, with a limitation of only adding text, date, dropdown, radio , matter, ID, number, currency, office, address, email and phone field types.
Choose the email body
7. In the email body section, select the document template whose content will appear in the body of the email. Its content and rules carry through to the email body - see the below known constraints section for further information.
Note: If you want a document to feed the email body without also generating as a standalone output, from Templates, locate the document, click on edit and tick Do not generate for live submissions. This is off by default. If you select such a document as the body, a toast confirms it won't generate separately.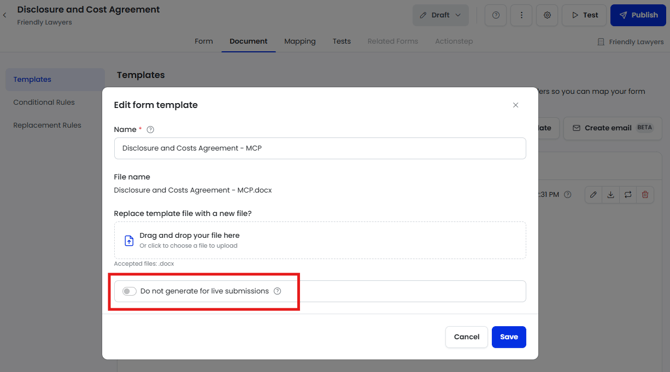
Attach documents (optional)
8. In the attachments section, select one or more generated documents to attach. Attachments are output as PDF. Documents marked Do not generate for live submissions can't be selected as attachments.
Apply logic to email template (optional)
9. Set logic on the email template the same way you do for document templates. The rule decides whether the email generates for a given submission.
Publish and generate
10. Save the template, then Publish the form. The email only generates in live submissions and in Published-mode tests once the form is published.
11. After a successful submission, the .eml file appears in the download modal with the other generated documents. It opens as a draft so the drafter can edit and send it.

Known constraints
Converting a Word document into an email is inherently lossy, and the same email can render differently depending on the client. The points below are current beta limitations. They reinforce the advice above: keep the body template simple.
- Headers and footers are stripped out. Don't put anything you need in them.
- Tables of contents are not supported. A table of contents is a document component, not an email one. It will be inserted but appear completely malformed, so leave it out of any body template.
- Numbered and bulleted lists keep their formatting, but exact indentation is not preserved due to limits in the email editor and HTML conversion.
- Tables can lose their border lines in Outlook new. The table stays fully editable, but may render without all borders.
- Two-column layouts are not supported in Outlook new.
- Custom fonts may not transfer and can fall back to the default font, even for fonts installed via Microsoft. This is inconsistent and we're still investigating the trigger. The recipient must have the custom font installed for it to display at all, so don't rely on custom fonts.
- Graphics may not transfer cleanly, especially in complex templates.
- Gmail does not support .eml files. Drafters using Gmail won't be able to open the generated file.
- Outlook new is where most of the table and column limitations above appear.
Common questions
Does Smarter Drafter send the email for me?
No. It generates a draft .eml file. The drafter downloads it, reviews it, and sends it from their own email client.
Why can't I find a field when typing in the To or CC field?
Only text and email-address field types are supported. Number, date, and other field types won't appear in the search.
Can I edit an email template after the form is published?
No. Editing, deleting, and changing conditional rules are only possible in Draft mode. In Published mode you can view the template in read-only.
What happens if the document used for the email body fails to generate?
The .eml file won't generate. If the .eml itself fails, the error appears in the submission details panel.
Will my email templates copy across when I clone a form or copy it to another tenant?
Yes. Email templates are included when you clone a form and when you copy a form to another tenant.